Seventh Generation sent me a pack of their new Touch of Cloth diapers in the newborn size – they even made my husband say, “Awwww.” They are free of fragrances, inks, and petroleum-based lotions and absorb 3X a standard wetting. Not too shabby for hippy diaper, eh?
It seems like a billion diapers ago (that number may actually be accurate) that I was a newbie at diaper changing but I can still remember how nervous I was to do it. It seemed like such a complicated operation when I’d see people do it. So thought, why don’t I do a “how to diaper a baby” post? I’ve stuck to disposable diapers for this one because that’s what I had on hand but I’ll do a cloth-diapering tutorial down the road, so stay tuned.
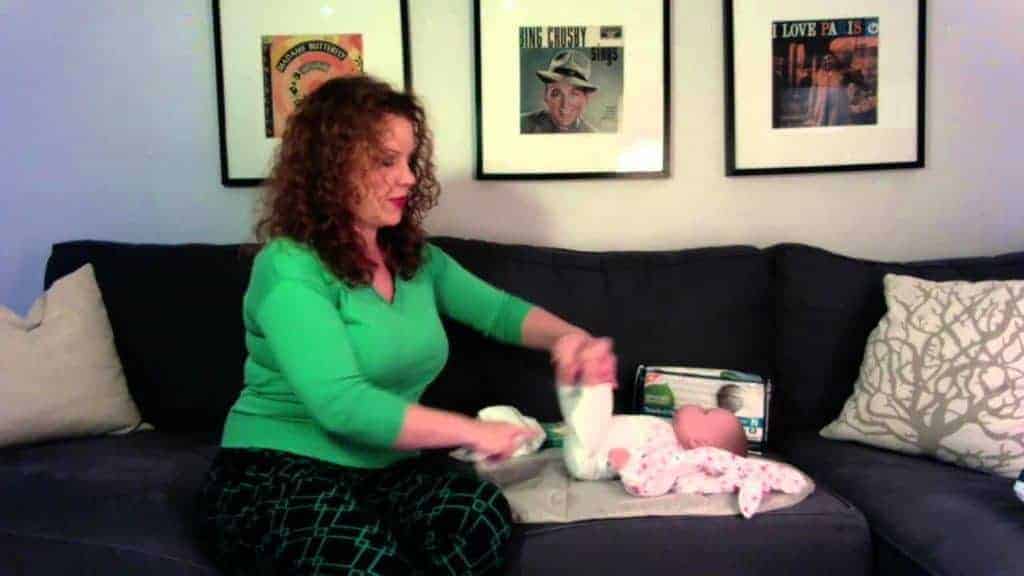
So here’s a quick video on how to do it with my fake baby, Flick, along with a step-by-step below if you don’t want to look at Bing Crosby hanging over my couch.
1. Confirm that the baby needs changing.
Some disposables have a line down the front to show when it’s wet but I found that it’s pretty easy to tell just by feel and smell – wet diapers feel heavy and poopy diapers smell shitty (go figure.) I changed my newborns fairly often just so I could make sure they were getting enough fluids plus they poop a lot in the beginning (around 3-4 poops a day.)
Note: When my first son was born I changed him every time I fed him but I started buttering up his bum with barrier cream before we went “down for the night” (sleep is a strong word there) and skated it until the morning. That way he wasn’t wide awake by the time all the diaper changing was done at 3am.
2. Get your gear
I had this beautiful change table set up, but 90% of the time I changed the boys on the couch, the bed, the back seat of the car, etc. so I just had a washable change mat, my container of wipes and two diapers (if you only have one I can guarantee shit will get on it.)
3. Check the damage
Pee? No prob. Undo the diaper, do a little air out and wipe if needed, and pop on a new diaper.
Poop? No prob. Get clothing out of the way, undo the diaper and use the front of the diaper to wipe up any extra poo then get it out of the way, use the wipes (going from front to back) to get the goods, put the soiled wipes in the dirty diaper, put the clean diaper on to minimize random air pees, then wrap the goods in the dirty diaper and dispose.
Blow out? No prob. Tell your partner you forgot something at the store then leave the house. (Just kidding). Get an old towel, receiving blanket or a pack of these disposable change pads, and peel off as much as you can without spreading the horror – check out this cool video for a great onesie hack. Wipe down as much as you can or hose them off in the tub (sometimes it was just easier to wash it off rather than wipe it off). [Tip: pre-soap everything before they go in the water so you know you got all the spots.] Once everyone is dry and clean, continue on like a normal diaper change. Roll everything up that can be salvaged and throw it in the wash or simply decide that it’s a “fuck it and chuck it” and throw it all out. I once spent 20 minutes trying to clean an old onesie before I thought, “What are you doing?! Cut bait and buy another $2 onesie, dummy!”
4. Wash your hands
Then wait 10 seconds for your baby to realize that a soft, clean diaper is the perfect thing to poop in.
Extra tips:
- If your baby’s umbilical cord hasn’t fallen off yet, just fold the diaper down so it doesn’t rub on it. Many newborn size diapers have a little cut out for it but some don’t. We never actually got to use newborn diapers because both our boys were monster babies (over 9lbs and 10lbs) so they went right into size one and those don’t have the cut out.
- Many sites suggest that you put the clean diaper under the dirty diaper before you start, then fold the dirty diaper under the baby’s bum while you work (you can see what I mean here because I’m not explaining this well.) This never worked for me because I found that the more poo there was in the vicinity, the more likely I was to get it on everything including me, the baby, and the clean diaper. If you are more coordinated than me then give it a whirl because it looks like a neat method.
- If there’s a great diaper sale somewhere – or you’re registering for them – stock up on size one or two (or the next size up depending what size your baby is in). Babies generally are in the newborn size for a short period of time and you can cheat a larger size but not a smaller size if you’re in a pinch.
- I read a great tip on a cloth-diapering site to buy newborn disposables even if you are cloth diapering so you skip that really small size in cloth.
- I didn’t find my kids needed diaper cream with every change. I only used it if I could see something was getting a little reddish. I would also make a point to air out their bums a bit more between changes and after baths because nothing heals a rash like drying and air. Also, it’s important to know the difference between a diaper rash and a yeast rash. Trapping moisture and heat with diaper cream on a yeast rash on a baby bum will only anger it – not that I’d know anything about that ::cough::
So there you have it. How to change a diaper. Simply follow these steps then repeat another 2,000 times and you’ll be a diaper changing wizard in no time.
Good luck!
You may also like: Diaper Rash Guide – causes, treatments and remedies
Leave a Comment